
When I finally organized everything for this, I realized that it's going to take 5 posts. So here we go :)
I'll start at the beginning. About two years ago I realized that I was dating the guy I wanted to spend the rest of my life with. I also started thinking that I might like to be the one to propose. I was contemplating doing it on our 3 year anniversary, but I had a feeling he might beat me too it (which I later confirmed), and I really wanted to propose. Why should guys have all the fun? All the planning and scheming, and trying to keep a secret that's REALLY HARD TO KEEP! So I decided to do it on our 1,000th day anniversary. I went down on one knee, and popped the question. He said Yes, after he got over the surprise ;) Yes, that was nice... I'm glad I did it, and he didn't mind that I did.
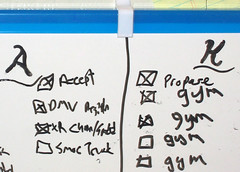
A few days later we put this up on our fridge to-do list, just for kicks:
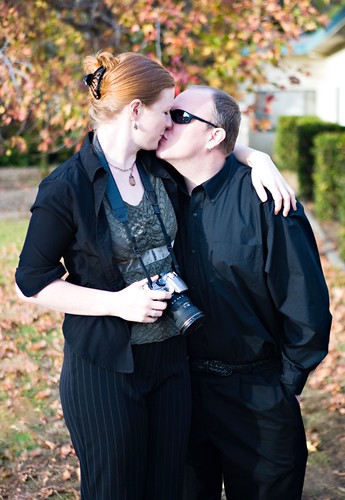
This is our unofficial engagement picture, at my Uncle's wedding.
Then, on to the dress! I had made no wedding or dress plans prior to proposing. We did all the wedding planning together, and I schemed on my own for the dress. I knew I wanted to make it, and I had a basic idea of the style in my head. I did a little surfing online to get inspired, and once I saw this picture, I stopped looking entirely.

We discussed color schemes, and decided on white, green (ivy and a soft green), and purple (plum), with silver accents. I made the main body of the dress super-shiny satin, with a matte sheer. It's almost the inverse of my inspiration picture, which is an organza over a duller satin/silk. I made the accents in green, but once I finished the dress itself, I decided to leave most decoration off. I found my fabric at the Costco of fabric shops, Fabrics R Us (they used to be called the more dignified "S.J. Fabrics.")
But before that, I needed a pattern. And a beta dress, which I made in black.
For the basic construction, I drafted up a pattern based on 3 things: that picture, a simple bodice with straps from McCall's (4109 view A), and Laughing Moon's Dore corset. I had made the corset a couple of times before, once for a black canvas true corset, and once for this red shimmery thing with plastic bones and a v-neck front. I'd make that again, but I'd put straps on it, since I don't do strapless unless it's a true corset. But back to the dress, corsets are for another post!
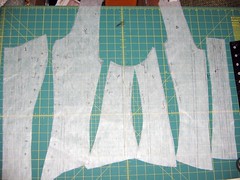
Here's my final pattern, which is about the 3rd incarnation. The test pieces were made from this hideous pink and orange plaid. You really don't want to see it, trust me on this...
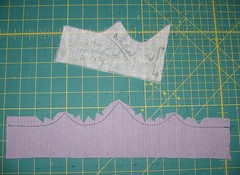
The arm band was a little tricky. I ended up putting a band of elastic inside the back 2 inches or so. That kept it in place, plus tacking it lightly to the sleeve itself.

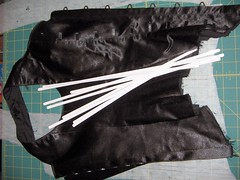
One side is complete, ready for the boning. I ended up using only 14 bones total, which is REALLY light for a corset, but just fine for a bodice. Notice the arm band is a little messy. It took me a couple tries to get that right. Hence the beta dress!
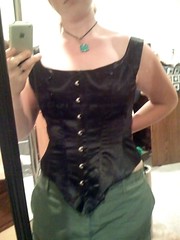
First fitting of the real beta top! The boning isn't in yet, because as you can see it's not very smooth. (picture is small because it's blurry from my phone). I'm holding the back, because I haven't put the lacing grommets in yet. Speaking of grommets, I <3 corsetmaking.com. I don't think I'll buy grommets anywhere else. They have nice, 2-piece grommets, and I was able to get black ones for the groom shirt. I also got boning there, plus lacing. I think they have great prices, and fast shipping, too. </plug>
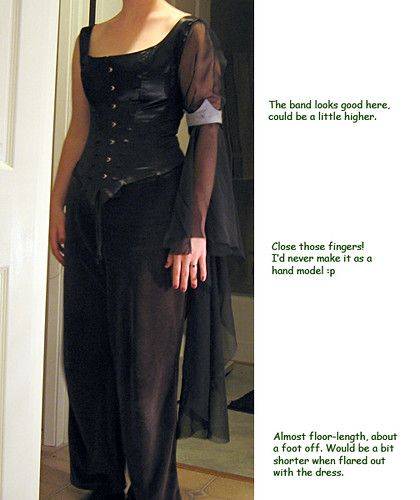
Here's another fitting, with one sleeve on, and my criticism on the right. I extended the sleeves a bit for the real thing. Yes, it's all about the sleeves =)
I was also simultaneously working on 2 bridesmaid dresses, 5 poets shirts (1 groom, 3 groomsmen, 1 bridesmaid), and a doublet-like top for my guy bridesmaid.
I'll start at the beginning. About two years ago I realized that I was dating the guy I wanted to spend the rest of my life with. I also started thinking that I might like to be the one to propose. I was contemplating doing it on our 3 year anniversary, but I had a feeling he might beat me too it (which I later confirmed), and I really wanted to propose. Why should guys have all the fun? All the planning and scheming, and trying to keep a secret that's REALLY HARD TO KEEP! So I decided to do it on our 1,000th day anniversary. I went down on one knee, and popped the question. He said Yes, after he got over the surprise ;) Yes, that was nice... I'm glad I did it, and he didn't mind that I did.
A few days later we put this up on our fridge to-do list, just for kicks:
This is our unofficial engagement picture, at my Uncle's wedding.
Then, on to the dress! I had made no wedding or dress plans prior to proposing. We did all the wedding planning together, and I schemed on my own for the dress. I knew I wanted to make it, and I had a basic idea of the style in my head. I did a little surfing online to get inspired, and once I saw this picture, I stopped looking entirely.
We discussed color schemes, and decided on white, green (ivy and a soft green), and purple (plum), with silver accents. I made the main body of the dress super-shiny satin, with a matte sheer. It's almost the inverse of my inspiration picture, which is an organza over a duller satin/silk. I made the accents in green, but once I finished the dress itself, I decided to leave most decoration off. I found my fabric at the Costco of fabric shops, Fabrics R Us (they used to be called the more dignified "S.J. Fabrics.")
But before that, I needed a pattern. And a beta dress, which I made in black.
For the basic construction, I drafted up a pattern based on 3 things: that picture, a simple bodice with straps from McCall's (4109 view A), and Laughing Moon's Dore corset. I had made the corset a couple of times before, once for a black canvas true corset, and once for this red shimmery thing with plastic bones and a v-neck front. I'd make that again, but I'd put straps on it, since I don't do strapless unless it's a true corset. But back to the dress, corsets are for another post!
Here's my final pattern, which is about the 3rd incarnation. The test pieces were made from this hideous pink and orange plaid. You really don't want to see it, trust me on this...
The arm band was a little tricky. I ended up putting a band of elastic inside the back 2 inches or so. That kept it in place, plus tacking it lightly to the sleeve itself.
One side is complete, ready for the boning. I ended up using only 14 bones total, which is REALLY light for a corset, but just fine for a bodice. Notice the arm band is a little messy. It took me a couple tries to get that right. Hence the beta dress!
First fitting of the real beta top! The boning isn't in yet, because as you can see it's not very smooth. (picture is small because it's blurry from my phone). I'm holding the back, because I haven't put the lacing grommets in yet. Speaking of grommets, I <3 corsetmaking.com. I don't think I'll buy grommets anywhere else. They have nice, 2-piece grommets, and I was able to get black ones for the groom shirt. I also got boning there, plus lacing. I think they have great prices, and fast shipping, too. </plug>
Here's another fitting, with one sleeve on, and my criticism on the right. I extended the sleeves a bit for the real thing. Yes, it's all about the sleeves =)
I was also simultaneously working on 2 bridesmaid dresses, 5 poets shirts (1 groom, 3 groomsmen, 1 bridesmaid), and a doublet-like top for my guy bridesmaid.
Next up:
The Bridesmaids and Site Decorations
Hair and Jewelry
The Dress
and then, The Wedding Day

No comments:
Post a Comment